Use DXF Export to export spatial data from your map to a Drawing Exchange Format (DXF) file for use in computer-aided design (CAD) applications.
DXF Export allows you to select an area of the map, choose which layers to include, and export their geometries and supported symbology. You can also clip geometries to the export boundary and select an output format compatible with your CAD software.
For example, a utility company can export a section of its network infrastructure to a DXF file for use in engineering drawings or design plans.
Requirements
DXF Export requires access to the VertiGIS Networks DXF Export service, which processes the export requests.
The DXF Export service is developed, maintained, and deployed separately by the VertiGIS Networks team. Studio Web uses this service to generate DXF files but does not manage its installation or configuration.
Before configuring DXF Export in Studio Web, ensure that the DXF Export service is installed, configured, and accessible from your deployment.
For information about installing and configuring the service, see the VertiGIS DXF Export documentation.
In Studio Web 5.44, DXF Export is supported only through the provided DXF Export UI component. It cannot be used in custom tools.
Configure DXF Export
Configure the DXF Export component in Studio Web Designer to make the export functionality available to users.
To configure DXF Export:
1.Open your application in Studio Web Designer.
2.Add the DXF Export component to your layout:
•Go to the Components panel and click Add New Component.
•Select the Other tab.
•Drag and drop the DXF Export component into the hierarchy of the Components panel.
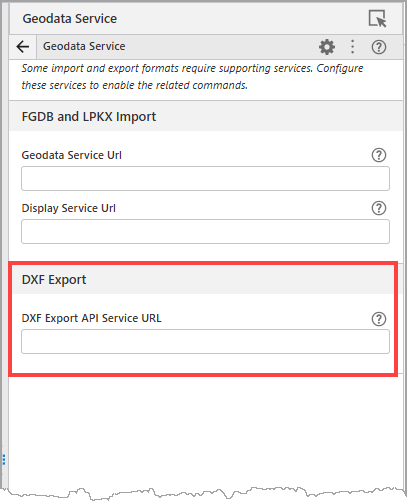
3.Go to Services > Geodata Service.
4.Enter the URL for your deployed DXF Export service.
5.Save your application.
The user can now export data to DXF.
Export Data to DXF
To export map data to a DXF file:
1.Open DXF Export in your Studio Web application.
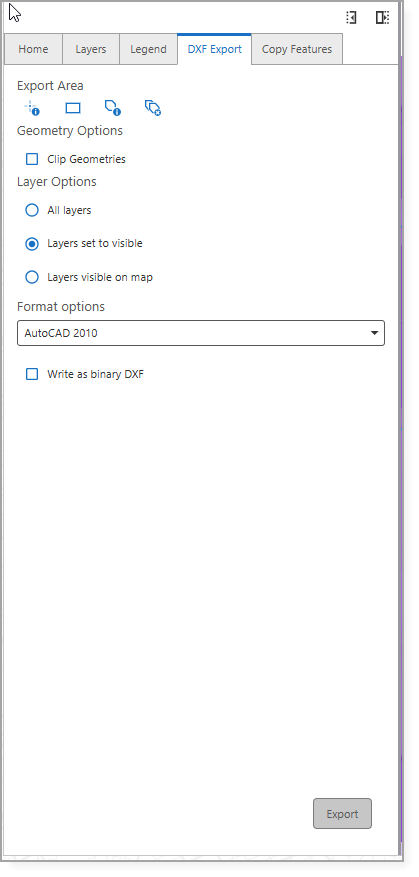
2.In the Export Area section, specify the area to export using one of the following options:
•Select Area: Select an existing polygon feature on the map to define the export area.
•Draw Rectangle: Draw a rectangle on the map to define the export area.
•Draw Polygon: Draw a polygon on the map to define the export area.
•Clear Area: Clear the current export area selection.
3.Optionally, enable Clip Geometries to clip features to the selected export boundary.
When enabled, geometries that extend beyond the export boundary are clipped at the boundary.
4.Under Layer Options, select which layers to include in the export:
•All Layers: Exports all layers, regardless of their visibility settings or scale dependencies.
•Layers set to visible: Exports layers that are enabled in the layer list. Layers within a disabled parent layer are excluded.
•Layers visible on map: Exports only layers currently visible on the map, taking layer visibility and scale dependencies into account.
5.Select from the list of Format options:
•AutoCAD2010: Exports data in a format compatible with AutoCAD 2010 and newer versions.
•AutoCAD2000: Exports data in a format compatible with older CAD applications.
6.Optionally, enable Write as binary DXF to generate a binary DXF file, which can reduce file size.
7.Click Export.
When the export is complete, the file is downloaded to your browser's default download location.
DXF Export supports one export operation at a time. Wait for the current export to finish before starting another export.
For additional information about DXF Export functionality, see Export a DXF File in the VertiGIS Networks documentation.