Configure Map Services
Edit a Map Service
Editing a map service allows you to configure the map service settings.
To edit a map service:
-
-
Click Map in the side panel.
-
Click the Map Services tab.
-
Click the Edit Map Service tool
 beside the map service that you want to edit.
Some types of map service have both a map service component and layer components. Make sure you are editing the map service, not a layer. When you position the pointer over the Edit tool, the tool tip should say Edit Map Service.
The map service opens for editing.
You can navigate between map services configured to your map with the Previous Map Service ![]() and Next Map Service
and Next Map Service ![]() icons. These icons appear next to the map service's name when you are editing the map service.
icons. These icons appear next to the map service's name when you are editing the map service.
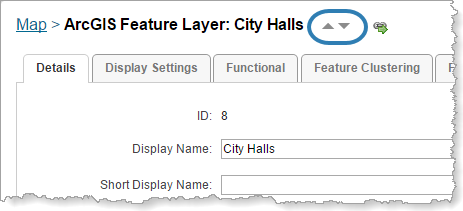
Icons to edit the previous or next map service
See also...
Edit a Map Service's Connection Settings
If a map service's URL or security settings change, Essentials cannot access the service any more. You must edit the service and update the connection settings so Essentials can access the service.
To edit a map service's connection settings:
-
In
-
Scroll down and click the Edit Connection Settings button.
-
Update the connection settings.
The specific settings that appear depend on the type of service.
-
Click OK.
-
Click Apply Details.
Map Service Settings
Map service settings are organized into tabs. The specific tabs that are available for a map service depend on the type of service.
To configure map service settings, edit the map service and click the desired tab. To find out about the settings on a particular tab, click the tab's link in the list below.
The map service tabs are:
-
Details tab: See Details Tab for Map Services.
-
Display Settings tab: See Display Settings Tab for Map Services.
-
Functional tab: See Functional Tab for Map Services.
-
Add/Remove Layers tab: See Exclude Layers from a Dynamic Map Service.
-
Drawing Order tab: See Layer Drawing Order.
-
Feature Clustering tab: See Clustering.
-
Feature Heat Maps tab: See Heat Maps.
-
Filtering tab: See Filtering.
-
Instant Search tab: See Instant Search.
-
Layer Hyperlinks tab: See Layer Hyperlinks.
Details Tab for Map Services
The specific settings that appear depend on the type of service.
The settings that can appear on the Details tab are:
-
ID: (for information only) The unique identifier for this service in the REST API.
-
Display Name: The name that is used to refer to this map service in Manager and in viewers. The Display Name can contain spaces and special characters.
-
Short Display Name: The name that is used to refer to this map service in small spaces in the viewer, for example, in a basemap transparency slider. If you do not configure the Short Display Name, the Display Name is used in small spaces. The Short Display Name can contain spaces and special characters.
-
Description: A short description of the service. The description is optional.
-
Copyright: Some organizations, such as Open Street Map, require anyone using their data to credit the organization. Use the Copyright setting to configure the attribution. The copyright appears in the lower right corner of the map in Manager and in viewers.
© <a href="http://www.openstreetmap.org/copyright" target="_blank">OpenStreetMap</a> contributorsThis appears on the map as:
© OpenStreetMap contributors.
If a map service has a copyright built into it, the built-in copyright appears in the copyright box by default. You can override the built-in copyright by adding a new copyright in the copyright box. To restore the default copyright, remove the custom copyright that you entered.
If more than one map service in a site has a copyright (either built-in or configured in Manager), the copyrights appear one after another on the map.
-
Include Copyright in Print/Export: If you want the copyright for this map service to appear on the map image when the map is exported, select the Include Copyright in Print/Export checkbox. For printing, you must also add a TextBox to each print template, and set the TextBox's DataField property to _CopyrightText:
-
Open the print template in Report Designer.
-
Drag a TextBox onto the print template and position it.
You may have to resize the TextBox to fit your needs.
-
Select the TextBox.
-
Scroll down the properties list on the lower right of Report Designer's interface and select the Data section.
-
Select the DataField property and add the text _CopyrightText in the empty field.
-
Save the print template.
-
-
Include Legend in Prints: (for ImageServers only) Indicates whether to include legend swatches in prints. This is only supported by VertiGIS Studio Printing.
-
Data Source Type: (for information only) The type of service that provides the map data, for example, ArcGIS Server REST or OGC WMTS.
-
Service Type: If the (tiled) service supports dynamic capabilities and you want the service to render dynamically, select Dynamic. This is useful if you have two tiled services with incompatible spatial references. When the Service Type setting is set to Dynamic, Essentials and applications try to project the service to a compatible spatial reference.
-
Spatial Reference: The service's spatial reference.
WMS and WFS services sometimes support more spatial references than are indicated in the service's metadata. If the service is not compatible with the map's spatial reference, you can try changing the service's spatial reference to see if a different spatial reference works. To change, select Change Spatial Reference and enter the spatial reference that you want to use. The format is usually an EPSG code, for example, EPSG:4326, but this depends on the service.
For WMTS services, if the WMTS is the bottom-most service in the list of services on the Map page's Map Services tab, then changing the tile matrix set changes the spatial reference of the map. However, when the WMTS is displayed on top of another map service, the WMTS attempts to use the spatial reference of the bottom-most service, regardless of what you configure for the tile matrix set.
-
Supports Dynamic Layers: (for information only) Indicates whether dynamic layers are enabled in ArcMap for this ArcGIS Server dynamic map service.
-
Connection String: (for information only) The connection string to connect to this service.
To open the service's REST endpoint, click the REST Endpoint Link icon
 beside the Connection String box.
 -
Edit Connection Settings: Select Edit Connection Settings and modify the settings as desired. The settings that are available depend on the type of map service.
After you have configured the connection settings, use the Test Connection button to verify the settings.
-
Service URL: Type or paste the map service's URL.
For example, for an ArcGIS Server map service,
http://host.domain.com/arcgis/rest/services, wherehost.domain.comis the ArcGIS Server host name. -
Layer Mask(s) (optional): If you add a single layer to the map, Essentials uses layer masks to mask the other layers in the map service. This is an advanced setting that requires a good understanding of layer masks.
-
Authentication Settings:
-
ArcGIS Server:
If the service is secured, select the authentication method for Essentials to use when connecting to the service.
If you are using a proxy page, Essentials uses the settings that you configure here to access the proxy page, rather than to access the service itself.
-
Web Tier (default or anonymous credentials): Select this option if:
-
The service is secured using Integrated Windows Authentication and you want Essentials to authenticate as the application pool user.
or
-
The service is not secured.
-
-
Web Tier (configured credentials): Select this option if:
-
The service is secured using basic or digest authentication.
or
-
The service is secured using Integrated Windows Authentication and you want to configure the credentials for Essentials to use when authenticating.
In the Username and Password text fields, enter the credentials that you want Essentials to use.
-
-
Token Security (by user): Select this option if the service is secured using token security.
In the Username and Password boxes, type the credentials that you want Essentials to use when authenticating. If you have changed the location where tokens are issued, type the URL of the location in the Token URL box.
By default, Essentials assumes the token duration of all your ArcGIS services is 60 minutes, which is the ArcGIS default. However, if the token duration of any of your ArcGIS services is shorter, you must specify the token duration in Essentials. To specify the token duration:
-
Open the Essentials
web.configfile.The Essentials
web.configfile is located in{GE_HOME}\REST\Web.config. -
In the
appSettingselement, add a newaddelement. -
Add a
keyattribute toappSettingsand set it toArcGisRestMapServiceBase.MaximumTokenDuration. -
Add a
valueattribute toappSettingsand set it to the maximum token duration in minutes.
For example, to set the maximum token duration to 20 minutes:
<add key="ArcGisRestMapServiceBase.MaximumTokenDuration" value="20" />.
-
-
Token Security (explicit tokens): In the Server Token box, type or paste the long-lived server token that Essentials will use to authenticate. You can also optionally configure a long-lived client token.
Select this option if the service is secured using token security and you want to use long-lived tokens. This method stores the token(s) in the site.
-
-
WMS and WMTS:
If the WMS or WMTS service is secured, configure the credentials that you want Essentials to use when authenticating. If you want Essentials to authenticate as the application pool user, leave the Username and Password boxes blank.
If you are using a proxy page, Essentials uses the settings that you configure here to access the proxy page, rather than to access the service itself.
-
KVP Tile URL Override: If the URL that is advertised by the WMTS service does not work or you want to use a different URL, enter the URL that you want to use.
-
RESTful Tile URL Template Override: If the URL that is advertised by the WMTS service does not work or you want to use a different URL, enter the URL that you want to use.
-
-
-
Proxy Settings: For ArcGIS Server services, you can use a proxy page, or the Geocortex Services Enhancement Proxy, or neither. You cannot use both.
-
No Proxy: If you are not using a proxy page and you do not want to use the Geocortex Services Enhancement Proxy, select No Proxy.
-
Geocortex Services Enhancement Proxy: (Silverlight viewers only) The Geocortex Services Enhancement Proxy is a reverse proxy that supports a variety of enhancements that appear in legacy Silverlight viewers.
If you do not use a proxy page and you want to use the Services Enhancement Proxy, select the Geocortex Services Enhancement Proxy checkbox. When the Services Enhancement Proxy is enabled, two additional settings are visible in Manager:
-
Forward Requests using Application Pool Identity: Select this checkbox to use the Essentials application pool's identity to access the service.
-
Resolve Coded Domains: Select this checkbox to turn on the full set of enhancements.
-
-
Proxy URL: If you are using a proxy page, type or paste the proxy page's URL.
For example,
http://host.domain.com/MapServiceProxy/proxy.ashx.
-
-
Get Map URL (optional): Enter the URL to use if the WMS URL fails. WMS operations can be hosted at different locations, so this option attempts to connect to second location if the URL provided by the WMS is inaccurate or you want your
GetMaprequests to target another location for other reasons. This parameter makes it possible to override the URL used forGetMaprequests to your preferred URL.The
GetMapparameter is optional. If you do not specify a URL, Essentials uses the URL from the capabilities of the WMS. Parameters from the service address are appended toGetMaprequests.The
GetMapparameter is part of the connection string, for example:ConnectionString="url=http://myserver/geoserver/wms;mapUrl=http://myserver/geoserver/wms/getmap"
-
WFS URL: If you are using either the WFS: ArcGIS Server or WFS: Name Correlation query provider, you must provide the WFS's URL here. If you are using the WFS query provider, this URL will override the URL in the capabilities document.
The
WFSServerparameter is part of the connection string parameter, for example:ConnectionString="url=http://myserver/ArcGIS/services/myservice/MapServer/WMSServer;wfsUrl=http://myserver/ArcGIS/services/myservice/MapServer/WFSServer"
-
WFS Version (optional): Select the version of WFS to use. If you do not set a version of WFS, the system uses the most recent supported version of WFS (up to version 2.0).
If the map service you are connecting to does not support the version of WFS selected in this field, the system uses an earlier version of WFS.
-
Proxy URL: If the WMS or WMTS map service is secured with a proxy, type or paste the proxy's URL.
For example,
http://host.domain.com/MapServiceProxy/proxy.ashx. -
WMS Version (optional): Select the version of the WMS specification to use in order to communicate to the server. If you do not set a version, the most recent supported version of WMS is used (up to version 1.3.0).
-
Map Style: Select the Bing Maps service that you want to connect to.
-
Key: Type or paste your Bing Maps key.
-
URL Template: Type the URL template for the tile server.
The URL template must contain the
{level},{col}, and{row}tokens. For example, a URL template might have the following form:http://{subdomain}.server.domain.com/{level}/{col}/{row}.png
See Web Tiled Layers for more information.
Some web tiled services use dollar signs (
$) in their URL templates. Dollar signs are optional in Essentials. -
Subdomains: If the web tiled layer's URL template contains the
{subdomain}token, list the subdomains that you want to submit tile requests to. Separate the subdomains in the list using commas.
-
-
Security Provider Name: Controls how the layer security proxy authorizes layers. If left unset, the default map security provider is used, which respects the settings on the Permissions page.
In most cases, this setting should be left blank, as it only applies to advanced scenarios. Do not use this setting unless you're sure you need to.
To see a list of map service security providers, click the Security Provider Name box.
By default, the map service security providers include:
-
DefaultMapServiceSecurityProvider: The default map service provider, which simply respects the settings on the Permissions page. This option is the same as leaving this setting blank. For a map service, users only have access to layers and tables included in the site. For a feature service, users have access to the configured layer as well as any related layers or tables.
-
AllowUnknownDynamicLayersProvider: Allows all dynamic layer requests. Allowing all dynamic layers can represent a security vulnerability. This should only be used in cases where the end users are trusted, or when security is simply used as a convenience to hide irrelevant data rather than to protect data.
-
AllowUnknownLayersProvider: Allows all layer and table requests. This provider does not secure any layers or tables.
-
AllowUnknownRelatedLayersProvider: Allows all related layer and table requests for map services that users are authorized to access. This setting is used to allow access to related layers and tables in a map service when an Administrator has not added those related layers and tables to the site. This emulates the default behavior in Essentials 4.4.
-
ConterraMapServiceSecurityProvider: Uses Con Terra's Web Security Service (WSS) to discover the permissions to be used for layers, rather than using the settings on the Permissions page.
-
DenyUnknownRelatedLayersProvider: Prevents feature services from automatically allowing access to related layers and tables.
-
-
Filter Workflow URI:The URI of a workflow for filtering features in one or more of this map service's dynamic layers.
Use this setting to configure a layer filter workflow that filters dynamic layers only. For filtering non-dynamic layers, configure the layer filter workflow at the layer level.
See Filter a Layer's Features for more information.
-
Allow Snapping: To allow users to snap to features, select the checkbox. If you do not want users to be able to snap to features, clear the checkbox.
-
Snapping Enabled: To enable snapping by default for features in this layer, select the checkbox. If you want snapping to be turned off by default, clear the checkbox.
Display Settings Tab for Map Services
The specific settings that appear depend on the type of service.
-
Icon URI: The URI to the icon that you want to use to represent this service. Click Browse to navigate to the icon file, or Upload the file to the site.
-
Opacity: Sets the map service's default opacity. For example, if you set the opacity to 30% in Manager, then end users initially see the map service at 30% opacity in the viewer, and the map service's opacity slider is initially set to 30%. End users can drag the opacity slider to change the map service's opacity.
-
Override Scale: The Override Scale settings allow you to restrict the scale range of the map service in Essentials. These settings override the scale settings that are defined in the map service itself.
-
Override Minimum Scale: The minimum scale at which the map service is visible in viewers. If a user zooms out farther than the Override Minimum Scale setting, the map service no longer shows on the map. If the map service is in the Layer List, the map service's Visibility becomes grayed out to indicate that the map service is not visible at the current scale.
For example, if the minimum scale defined in the map service itself is 1:10,000,000, you could restrict the minimum scale to 1:5,000,000 in Essentials.
To configure the minimum scale, enter the scale's denominator, without commas or other punctuation. For example, to set the minimum scale to 1:5,000,000, enter 5000000 in the Override Minimum Scale box. If you leave the Override Minimum Scale box blank, Essentials uses the minimum scale that is defined in the map service itself.
-
Override Maximum Scale: The maximum scale at which the map service is visible in viewers. If a user zooms in closer than the Override Maximum Scale setting, the map service no longer shows on the map. If the map service is in the Layer List, the map service's Visibility becomes grayed out to indicate that the map service is not visible at the current scale.
For example, if the maximum scale defined in a map service is 1:500, you could restrict the maximum scale to 1:2,000 in Essentials.
To configure the maximum scale, enter the scale's denominator, without commas or other punctuation. For example, to set the maximum scale to 1:2,000, enter 2000 in the Override Maximum Scale box. If you leave the Override Maximum Scale box blank, Essentials uses the maximum scale that is defined in the map service itself.
A common use for the Override Scale settings is to make one base map become visible when another loses visibility as the user zooms the map. To configure this, set Override Maximum Scale for one base map to the same scale as Override Minimum Scale for the next base map.
The Geocortex Viewer for HTML5 supports these settings for all map services—tiled and dynamic map services, operational map services and basemaps, and all map service types.
In addition to these settings, which control the scale range of a map service, the Geocortex Viewer for HTML5 has settings that enable you to restrict or extend the scale range of the map, Override Minimum Scale and Override Maximum Scale. For information, see Scale Range Settings.
-
-
Maximum Image Size: ArcGIS Server has a default maximum size for the map images that it exports. ArcGIS Server provides settings to override the default size. If you have configured a smaller size for map images in ArcGIS Server, you must configure the size here. If you have configured the image size to be larger, or you are using ArcGIS Server's default size, you do not need to configure these settings.
-
Maximum Image Width: If the map image width that is configured in ArcGIS Server is smaller than ArcGIS Server's default map image width, enter the width in the Maximum Image Width box. This setting applies to dynamic map services only.
-
Maximum Image Height: If the map image height that is configured in ArcGIS Server is smaller than ArcGIS Server's default map image height, enter the height in the Maximum Image Height box. This setting applies to dynamic map services only.
-
-
Brush Color: Select the color for markers and geometries in the GeoRSS layer. This color is also applied to shapes, if the feed has them.
-
Image Format: Specifies the image format to use when displaying the map.
-
Color: Specifies the color of a feature layer. Type in the hexadecimal value of the number or click the color picker
 and select a color.
When the feature color is set, any renderer that is not a Simple renderer is replaced with a Simple renderer. So Class Break, Unique Value, or custom renderers are converted to Simple renderers. This means that properties assigned to the feature that require non-simple renderers will not display. For example, a city feature layer with points representing cities would show different point sizes based on the population of the city. If the feature color of the city points was then set to blue, the cities would be shown as blue dots of the same size.
-
Color Alpha: Specifies the transparency/opacity of features. Move the slider to the left to increase the transparency of the feature.
-
Selection Color: Specifies the color to use when a feature is selected. Type in the hexadecimal value of the number or click the color picker
and select a color. This setting only works within the context of editing.
Field Formatting
You can also configure Field Formatting at the layer level and the field level. For information, see Field Formatting.
These settings do not work for GeoRSS layers—GeoRSS layers do not provide any information about the type of data that their fields contain, so viewers cannot format the data.
-
Number Format: (numeric fields only) (does not apply to GeoRSS layers) The format to use to display the field's value in HTML5 viewers.
You can configure the format at the map service level, the layer level, and the field level. The default value, Default, inherits the formatting from a higher level. If all three levels are set to Default, fixed-point formatting with up to four decimal digits is used.
-
Currency: (applies to the Currency and Accounting number formats only) The currency type of the stored data. For example, if the stored data is in euros, enter EUR. The default is USD (US Dollars). To see a complete list of currency codes, delete the default currency type—a drop-down list of currency codes will open. To find out what the codes stand for, refer to this list of ISO 4217 currency codes.
-
Decimal Places: The number of decimal digits to display in viewers. To display integers, enter 0. Alternatively, leave the Decimal Places setting blank to display up to four decimal digits (Number, Fixed-point, and Percentage formats) or the conventional number of decimal digits for the specified currency (Currency and Accounting formats).
-
Custom Number Format: The custom format string that you want to use to format numbers in the viewer. Essentials supports custom format strings based on the .NET Framework Custom Numeric Format Strings. Do not put quotation marks around the custom format string.
-
-
Date Format: (date/time fields only) (does not apply to GeoRSS layers) The format to use to display the field in the viewer.
-
Custom Date Format: The custom format string that you want to use to format dates in the viewer. For formatting instructions, see Format Date/Time Fields. Do not put quotation marks around the custom format string.
-
-
Data Time Zone: Choose a time zone for the selected layer. By default, the time zone is set to Default, which inherits the time zone from a higher level. For more information, see Time Zones.
Functional Tab for Map Services
The specific settings that appear depend on the type of service.
-
Failure Action: Specifies the behavior of the site's viewers if this service is not available when the site is loaded. The failure action does not affect user sessions that are already in progress when a service goes down. The possible failure actions are:
-
Ignore: The viewer does not warn the user that the service is not available. The user can proceed to use the application. (The service will not work).
-
Warn: The viewer displays a warning to the user that says the service is not available. The user can close the warning and proceed to use the application. (The service will not work). This is the default value.
-
Error: The viewer displays a warning to the user that says the service is not available. The user cannot close the warning, and cannot use the application.
Failure Actions cannot occur if the site completely fails to initialize. You can manually verify if a site initializes by visiting its REST endpoint or by opening the site in Manager successfully.
-
-
Failure Timeout: Sets the timeout in seconds. Once the timeout is reached, the map service no longer attempts to load and the configured failure action is performed.
This setting accepts values between 1 and 600.
-
Default Allow Symbolization (Silverlight viewer only): (ArcGIS Server map services with dynamic layer support) Specifies whether or not to allow symbolization of this map service.
-
(Default) Data Provider: The (Default) Data Provider is the type of data provider that you use to store feature data. This setting is used by the viewer. It enables the Query Builder and Filter Builder to construct queries using the correct syntax for your data provider.
You can configure this setting at the site level, the map service level, or the layer level.
-
At the site and map service level, the setting is called Default Data Provider.
-
At the layer level, the setting is called Data Provider.
Map services inherit the setting from the site, and layers inherit the setting from the map service that they belong to, or from the site if the setting is not configured at the map service level. For example, if all the site's services use the same data provider to store their feature data, you could configure the Default Data Provider at the site level. The map services and layers inherit the configuration. This saves you from having to configure the setting for every map service and layer in the site.
By default, the provider is Default. The Default provider uses the ANSI SQL default syntax. If the Default provider does not work in your system, delete Default from the Default Data Provider box to open a drop-down list of providers.
If the type of provider that you use appears in the list, select the provider. The Query and Filter Builders will use the well-known syntax for the provider that you select. If your provider does not appear in the list, re-enter Default in the Default Data Provider box, and configure the viewer's QueryBuilder Module.
If the map service only has one layer, the Default Data Provider setting is not available at the map service level. For example, feature services do not have a Default Data Provider setting, but feature layers do.
-
-
Tile Matrix Set: Select the tile matrix set to use for the WMTS. The
TileMatrixSetparameter sets the tile matrix set to use, for example,TileMatrixSet="EPSG:900913".If you add a second WMTS on top of another tiled service, Essentials attempts to find a tile matrix set that is compatible with the tiled service that is lowest in the list of services on Manager's Map page.
If you do not specify a tile matrix set for the primary service, Essentials uses the first matrix set for the configured layer that has a supported spatial reference.
-
Request Encoding: Currently, only KVP (Key-Value Pairs) is supported.
-
Update interval: The frequency for the viewer to refresh the map image for a dynamic map service, in seconds. If you do not set an interval, the map refreshes only when a user performs an action that forces the map to redraw, like pan or zoom.
-
Override Time Settings (Silverlight viewer only): For ArcGIS Server time-aware map services. Specifies the time extent to use as the extent of the time-aware slider. The range that you configure here overrides the time extent that is set in the map service.
-
Start Time and End Time: The date for the time slider to start and end. Select the Start Time or End Time box to open a calendar for that setting.
-
-
Basemap Transparency Slider Group: (does not apply to ArcGIS Server feature layers, KML layers, or GeoRSS layers) The name of the basemap transparency slider group for the map service to belong to, if you want the map service to appear in a transparency slider with other related map services. Entering a new slider group name creates the slider group. The slider group name appears in the Basemap Switcher, so choose a name that is short, and also meaningful to end users. To add the map service to an existing slider group, click in the Basemap Transparency Slider Group box and select the group from the drop-down list.
If you do not want to use the map service in a transparency slider, leave the Basemap Transparency Slider Group box empty.
-
Layer Catalog Provider Name: The fully qualified type name of the layer catalog implementation for an ArcGIS Server dynamic layers-enabled map service, if there is one.
This method of adding layer catalogs is deprecated and requires custom development. See Create a Site with a Layer Catalog for more information about this implementation.
-
Query Provider: (ArcGIS Server map services and feature layers, WMS and WMTS) For WMS services, select the data source that you want Essentials to query. You must configure this setting for WMS services regardless of whether you are using a WFS. See OGC Query for information about specific options.
The
QueryProviderNameURL parameter specifies the query provider to use. For example,QueryProviderName="WFS: ArcGIS"orQueryProviderName="WMS: text/plain".You do not need to change this setting for other types of service. This setting is used for server-side queries only.
-
Query Transform Workflow URI: If you created a Query Transform workflow to modify the results of WMS
GetFeatureInforequests, enter the workflow's location. For more information about Query Transform workflows, see Create a Query Transform Workflow. -
Search Non-Text Fields: When this checkbox is selected, Global Search searches all types of field in an ArcGIS Server feature layer, instead of just text fields.
-
Disable Client Caching: When this checkbox is selected, map images and feature data are never loaded from the browser's cache. The data is always requested from the server. This is useful if the map service changes frequently and end users need to see the most up-to-date map data.
Client caching improves performance. If you disable client caching, performance will be slower.
-
Output Fields: Output fields are the fields in a feature layer that are available in the viewer for client-side operations like editing.
For example, suppose a feature layer has five fields and you configure two of the fields as output fields. When a viewer requests the feature layer, the server only sends the two output fields for each feature. This means the other three fields cannot be used in client-side operations like editing. The excluded fields are still available for server-side operations like search and identify.
By default, all the fields in the layer are output fields. This is represented in Manager by an asterisk (*) in the Output Fields box. If there are some fields that you do not want to be available in viewers, replace the asterisk with a comma-separated list of field names.
-
Query Mode: The query mode determines when the viewer requests feature data from an ArcGIS Server feature layer or OGC service:
-
Snapshot: The viewer gets all the available features at one time. This is useful if the map extent does not change.
-
Selection Only: The viewer gets the currently selected feature. The viewer requests one feature at a time. This option is only available for ArcGIS Server feature layers.
-
On Demand: The viewer gets the features for the current extent, as well as On Demand Cache Size additional features. The viewer requests more features as the map extent changes.
The On Demand query mode has additional settings:
-
On Demand Cache Size (Silverlight viewer only): The number of features to cache, in addition to the features in the current extent.
-
Tile Height and Tile Width: If the feature layer takes a long time to load, adjusting the tile size may improve the performance. A layer whose features are sparsely distributed may load faster with a larger size. If the features are densely distributed, a smaller tile size may improve load times. The default tile size is 512px by 512px. For more information, refer to the ArcGIS documentation on Vector Tiling.
-
-
Editing
In order to be editable, a feature layer must have editing enabled in ArcGIS Server.
-
Auto Save (Silverlight viewer only): When this checkbox is selected, an end user's editing changes are submitted immediately, without the user having to save the changes.
-
Move Enabled: When this checkbox is selected, the end user can move the layer's features on the map.
-
Rotate Enabled: When this checkbox is selected, the end user can rotate the layer's features.
-
Scale Enabled: When this checkbox is selected, the end user can scale the layer's features. This setting does not work for point layers.
-
Edit Vertices Enabled:When this checkbox is selected, the end user can change feature geometries by moving a feature's vertices. This setting does not work for point layers.
Configure a Map Service's Default Visibility
A map service's visibility setting controls whether the map service is initially turned on when the end user launches a viewer. A map service must be turned on for the user to be able to see the map service's layers on the map. The layers only show on the map if they are visible at the initial extent's zoom level—the user may have to zoom the map in or out to see a layer's features.
If the map service has layer components, you can also set the default visibility of layers.
If you include a map service in the Layer List, the end user can change the visibility of the map service or its folder. See Configure the Layer List for instructions.
To configure a map service's default visibility:
-
In
You cannot change the default visibility of dynamic map services on the Map Services tab. Instead, click the Layer List tab and set the default visibility for the map service's folder.
-
Configure the visibility:
-
On: To configure the map service to be turned on initially, select the checkbox to the left of the map service's name.
-
Off: To configure the map service to be turned off initially, clear the checkbox to the left of the map service's name.
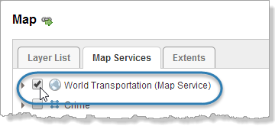
Set the default visibility for the World Transportation map service
-
-
Click Apply Changes.
Exclude Layers from a Dynamic Map Service
In Geocortex Essentials, you can exclude individual map layers that belong to dynamic map services, specifically, ArcGIS Server dynamic map services and WMS services. If you exclude a layer, it cannot be accessed by viewers. You can re-include a layer that was previously excluded. By default, all layers are included.
To exclude layers from a dynamic map service:
-
In
-
Click the Add/Remove Layers tab.
-
To exclude one or more layers, select the layers in the Included Layers column, and then click the » button.
To re-include layers that have been excluded, select the layers in the Excluded Layers column, and then click the « button.
To select multiple layers, hold the Ctrl key down while selecting layers.
You cannot include or exclude individual sub-layers within a group layer. You must include or exclude the entire group layer.
-
Click Submit Layer Changes.
Update a Map Service's URL
If the URL to a map service changes after you have added the service to the map, you must update the URL in Manager. For example, if the KML that defines a KML layer is moved to a new location, you must update the URL. Another reason to update the URL is to change the protocol (HTTP, HTTPS) that you use.
To update the URL for a KML layer:
-
In Manager, edit the KML layer that you want to configure.
-
On the Details tab, scroll down and click the Edit Connection Settings button.
-
Update the URL.
-
Click OK.
-
Click Apply Details.
Remove a Map Service from a Site
Removing a map service does not remove the map service's folder from the Layer List. This ensures that any other items in the folder are not affected when you remove the service. If there were no other items in the folder, the folder will be empty after you remove the map service. Empty folders do not show in viewers.
To remove a map service from a site:
-
In
-
Click the Remove tool
 beside the map service that you want to remove.
You are prompted to confirm.
-
Click OK.
The map service is removed from the Map Services tab.
-
If removing the map service left an empty folder in the Layer List, and you want to remove the folder:
Viewers do not display empty folders in the list of map layers.
-
Click the Layer List tab.
-
Click the Remove tool
beside the empty folder.You are prompted to confirm.
-
Click OK.
The folder is removed from the Layer List.
-
-
Click Apply Changes.