Replacement Tokens
Replacement tokens are placeholders that represent different aspects of a site and its data. There are two types of replacement token:
-
Server and Client Tokens: Represent file paths and URIs in your Geocortex Essentials installation. They allow you to configure file paths and URIs without having to know where Geocortex Essentials is installed on disk.
Using server and client tokens in a site's configuration improves the site's portability. They make it possible to migrate the site from one installation of Geocortex Essentials to another without having to update file paths or URIs in the site's configuration. Server and client tokens also reduce the possibility of spelling and typing errors in file paths and URIs.
-
Map Service, Layer, Field, Object, and Data Link Tokens: Represent aspects of the current item that is being processed in the viewer.
For example, suppose an end user performs an identify operation that finds several features—a hospital, a county, and so on. You have used layer tokens, map service tokens, and field tokens in the feature descriptions.
When the viewer displays the hospital feature in the Results List, the viewer interprets the layer tokens in the feature description to represent aspects of the Hospitals layer. When the viewer displays the county feature, the viewer interprets layer tokens to represent aspects of the Counties layer.
Similarly, for the hospital feature, map service tokens represent the map service that the Hospitals layer belongs to, and field tokens represent the hospital feature's fields. For the county feature, map service tokens represent the map service that the Counties layer belongs to, and field tokens represent the county feature's fields.
Using map service, layer, field, object, and data link tokens make it easier to maintain your site. They also improve the usability of your viewers.
Replacement tokens are case sensitive. To ensure you use the correct capitalization, use the Rich Text Editor to insert replacement tokens into the configuration.
Server Tokens
Server tokens allow you to enter file paths and URIs in Manager without having to know where Geocortex Essentials is installed on the disk. When a site is loaded, Geocortex Essentials replaces any server tokens that appear in the site configuration with the actual values that the tokens represent.
Server tokens are usually used to reference resources which reside on the server and are not publicly accessible.
Geocortex Essentials supports the following server tokens:
-
{RootPath}: Represents the fully qualified path of the Geocortex Essentials sites folder, using file path notation. For example:
{RootPath}\Viewers\SilverlightViewer
-
{SitePath}: Represents the fully qualified path to the directory containing the site configuration file. For example:
{SitePath}\Resources
-
{RootUri}: Represents the URI to the REST API Sites directory in the file system (not the HTTP- based URL to the root REST endpoint). For example:
{RootUri}Workflows/SearchForSchools.xaml
-
{SiteUri}: Represents the URI to the site within the REST API Sites directory in the file system (not the HTTP-based URL to the site’s REST endpoint). For example,
{SiteUri}/Resources/TemplateReports/LowIncome.rpx
Use the {RootUri} and {SiteUri} tokens when the property requires a web URI, such as when using print templates. The URIs generated by these tokens are not publicly accessible web URLs. Use the {RootPath} and {SitePath} tokens when a file system path is required.
Client Tokens
Client tokens allow you to enter file paths and URIs in Manager without having to know where Geocortex Essentials is installed on the disk. They are usually used to represent publicly accessible resources, such as images, that are needed by a viewer. Client tokens are replaced by the viewer (the client), rather than the Geocortex Essentials server.
Essentials supports the following client tokens:
-
{VirtualDirectoryUrl}: Represents the URL to the site’s virtual directory.
-
{SiteRestUrl}: Represents the URL to the site.
-
{RestVirtualDirectoryUrl}: Represents the URL to the global virtual directory of the Geocortex Essentials REST application.
-
{HostUri}: Represents the URL of the web application or web site that is hosting the viewer, or the file system root URI of the application if you are consuming the site through a WPF application.
-
{RestToken}: Represents the Essentials access token. Applications must supply the access token to access Essentials when Layer Security is in force and Anonymous Access is disabled. Use {RestToken} with the
tokenURL parameter to configure URLs that point back to the Essentials server from a viewer.For example, if the layer is secured and Anonymous Access is disabled, the URL that a viewer would use to access a feature attachment might look like this:
http://server.domain.com/sites/mysite/map/mapservices/0/MapServer/26/attachments/3601?token={RestToken}
See also...
Example 1 in Layer Tokens
Map Service Tokens
Map service tokens are placeholders that represent properties of the map service that the current layer belongs to. They enable you to configure text and hyperlinks that Geocortex Essentials interprets differently for different map services, even though the configuration is identical. Map service tokens can be used in the Feature Label, Feature Description, and Feature Long Description, in feature hyperlinks, and in layer hyperlinks.
Geocortex Essentials supports the following map service tokens:
-
{MapServiceDisplayName}: Represents the display name that is configured for the current map service. The display name is configured in the Display Name box on the map service's Details tab.
The {MapServiceDisplayName} token is useful if you are presenting information about the map service to the end user.
-
{MapServiceId}: Represents the ID of the current map service. The ID is shown on the map service's Details tab.
The {MapServiceId} token is useful for operating on the current map service.
-
{MapServiceUrl}: Represents the Essentials REST URL for the current map service. For example, for the first map service of a site named
MySite, {MapServiceURL} representshttp://MyServer.com/Geocortex/Essentials/REST/sites/MySite/map/mapservices/0. The number at the end of the URL is the ID of the current map service. This token does not return the ArcGIS map service URL. -
{MapServiceToken}: Represents the ArcGIS security token for the current map service.
The {MapServiceToken} replacement token is useful for accessing the current service when the service is secured using ArcGIS token security.
Example: Use Replacement Tokens to Show Images from a Token-Secured Service
Suppose you have a site that includes a token-secured ArcGIS Server map service with a Tax Parcels layer. Each feature in the Tax Parcels layer has a photo that is configured as a feature attachment and a PHOTOID field which contains the ID of the attachment. You want the photo to be displayed in search and identify results, so end users can easily scan the results.
-
You want the parcel's address to appear at the top.
-
The photo should appear underneath the parcel address.
-
The owner's name should appear underneath the photo.
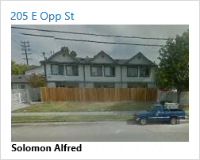
Desired appearance of a Tax Parcels feature in search and identify results
For this example to work, you must create and set the PHOTOID field for each feature.
To configure this, you use the Tax Parcels layer's Feature Label and Feature Description settings.
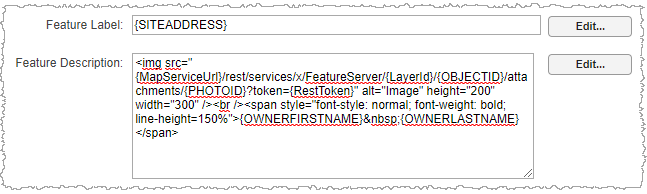
The Feature Label appears above the Feature Description in search and identify results, so you use the Feature Label for the parcel's address. To show the address for the current feature, you use a field token. The field in the Tax Parcels layer that contains the address is called SITEADDRESS, so you enter {SITEADDRESS} as the Feature Label.
The Feature Description has two parts: the photo and the owner's name. For the photo, you define an HTML image tag (<img>) that specifies the URL for the attachment file that contains the photo. You use a combination of map service tokens, layer tokens, and field tokens.
For a map service, the image tag looks like this:
<img src="{MapServiceUrl}/rest/services/x/MapServer/{LayerId}/{OBJECTID}/attachments/{PHOTOID}?token={RestToken}" alt="Image" height="200" width="300">
For a feature service, the image tag looks like this:
<img src="{MapServiceUrl}/rest/services/x/FeatureServer/{LayerId}/{OBJECTID}/attachments/{PHOTOID}?token={RestToken}" alt="Image" height="200" width="300">
Here is the definition for each map service token:
-
{MapServiceUrl} is the map service token that represents the map service's URL, for example,
http://MyServer.com/Geocortex/Essentials/REST/sites/MySite/map/mapservices/0. -
{LayerId} is the layer token that represents the ID of the current layer, in this case, the Tax Parcels layer.
-
{OBJECTID} is the field token that represents the OBJECTID field. Each feature in the Tax Parcels layer has a unique OBJECTID. The {OBJECTID} token identifies the current feature.
-
{PHOTOID} is the field token that represents the PHOTOID field, which contains the ID of the attachment to display in the feature description.
-
{RestToken} is the security token that Essentials uses to access the map service. This token is only suitable for map service security applied through Essentials.
To display the owner's name, you use the {OWNERFIRSTNAME} and {OWNERLASTNAME} field tokens.
Configuration that controls the content and appearance of search and identify results
By default, the HTML5 Viewer shows the Feature Long Description in search and identify results, not the Feature Description. To make the viewer show the Feature Description instead of the Feature Long Description, you set the Results List Content Field setting for the viewer to Feature Description.
Insert Map Service Tokens Using the Rich Text Editor
To insert map service tokens using the Rich Text Editor:
If you know the name of the map service token you want to insert, you can simply type it in. Make sure you use the correct capitalization when you type in a map service token. Essentials does not recognize the token if the capitalization is wrong.
-
Click the Edit button beside the item that you are configuring.
Every configuration item that can contain map service tokens has an Edit button beside it.
-
In the bottom box, type as much of the item's configuration as you can, omitting the map service tokens.
-
Position the cursor where you want to insert a map service token.
-
Select the map service token that you want to use from the Replacement Token drop-down list.
-
Click Insert.
The map service token is inserted at the cursor position.
-
Continue to insert as many map service tokens as you want.
-
Click OK.
Layer Tokens
Layer tokens are placeholders that represent properties of the current layer, including any custom properties that you have defined. They enable you to configure text and hyperlinks that viewers interpret differently for different layers, even though the configuration is identical. Layer tokens can be used in feature labels and feature descriptions, feature hyperlinks, and layer hyperlinks.
For example, suppose you configure the feature descriptions in both the Cities layer and the Streams layer to say "This feature is in the {LayerDisplayName} layer". In a viewer, a city's feature description appears as "This feature is in the Cities layer". A stream's feature description appears as "This feature is in the Streams layer". Now suppose you change the display name of the Cities layer to Urban Areas in Essentials. When a user selects a feature on the Cities layer, the feature description now appears as "This feature is in the Urban Areas layer".
Essentials supports the following predefined layer tokens:
-
{LayerDisplayName}: Represents the display name that is configured for the current layer. The display name is configured in the Display Name box on the layer's Details tab.
The {LayerDisplayName} token is useful if you are presenting information about the layer to the end user.
-
{LayerId}: Represents the ID of the current layer. The Layer ID is shown on the layer's Details tab.
The {LayerId} token is useful for operating on the current layer.
-
{LayerName}: Represents the current layer's name in the underlying map service. The Layer Name is shown on the layer's Details tab.
-
{LayerDescription}: Represents the description that is configured for the current layer. The description is configured in the Description box on the layer's Details tab.
The {LayerDescription} token is useful if you are presenting information about the layer to the end user.
Layers also support tokens representing Arcade expressions.
Example 1: Use Layer Tokens to Construct URLs and User Interface Text
This example uses layer tokens to construct a hyperlink that points to the metadata for the current layer.
-
Name each metadata file after its layer.
For example, the metadata for the Airports layer is in a file called
Airports.html. You create aMetadatafolder in the site's virtual directory where you place the metadata files. You also have anIconsfolder in the virtual directory, where you place the image file for the hyperlink’s icon. -
Edit the Airports layer in Manager and add a layer hyperlink.
-
Use the {LayerDisplayName} token in the hyperlink text and the tool tip.
-
Use the {LayerName} token in the hyperlink's URI and the icon's URI.
To construct the URIs, you use the {VirtualDirectoryUrl} client token to point to the site's virtual directory, and the {LayerName} layer token to construct the file names:
-
Hyperlink URI:
{VirtualDirectoryUrl}/Metadata/{LayerName}.html -
Icon URI:
{VirtualDirectoryUrl}/Icons/{LayerName}.png
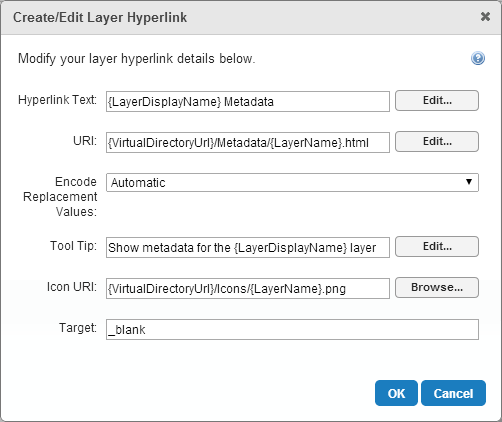
Layer hyperlink configuration containing layer tokens
-
Example 2: Use a Layer Token as a Workflow Argument
This example uses a layer token as a workflow argument.
Suppose you are creating a workflow that operates on a layer. You name the workflow OperateOnLayer. To allow the workflow to operate on different layers, you define an input parameter that takes the ID of the layer to operate on. You name the parameter LayerID.
You could make the workflow operate on a specific layer by specifying the layer ID. For example, you could configure a hyperlink that makes the workflow operate on layer 19 by specifying LayerId=19, and then you could configure another hyperlink that makes the workflow operate on LayerId=23, and so on. You need to configure the hyperlink differently for each layer.
To create a single, generic, hyperlink that makes the workflow operate on the current layer, you use the {LayerId} token instead of a specific layer ID:
<a href="command:RunWorkflowWithArguments?workflowId=OperateOnLayer&LayerID={LayerId}">Run workflow on {LayerDisplayName} layer</a>
You could use a hyperlink like this in feature descriptions.
Insert Layer Tokens Using the Rich text Editor
To insert layer tokens using the Rich Text Editor:
-
Click the Edit button beside the item that you are configuring.
Every configuration item that can contain layer tokens has an Edit button beside it.
-
Select the layer token that you want to use from the Replacement Token drop-down list.
-
Enter the content, omitting any field tokens.
-
Position the cursor where you want to insert the layer token that you selected.
-
Click Insert.
The layer token is inserted at the cursor position.
-
Continue to insert as many layer tokens as you want.
-
Click OK.
Field Tokens
Field tokens are placeholders that represent a layer's fields, in other words, feature attributes. They enable you to create text and hyperlinks that vary according to attributes of the current feature.
Field tokens can be embedded into the configuration of some text items and URIs. When the item is displayed in the viewer, the token is replaced with the field's value for the selected layer. For example, if the user selects Gastonia on the Cities layer, the {CITY_WEBSITE} field token is replaced by http://www.cityofgastonia.com.
Field tokens can be used to configure feature labels and feature descriptions, and feature hyperlinks.
The capitalization of a field token matches the field's capitalization in the map service. For example, the field token for the CITY field is {CITY}, not {City} or {city}.
Example: Use Field Tokens to Display Feature Information
This example uses field tokens to display feature information for a site's Parcels layer.
To start, you edit the Parcels layer in Manager. This opens the page where you configure the Feature Label, Feature Description, and Feature Long Description.
You want the Feature Label to say "Parcel ID:", followed by the parcel's ID. You type Parcel ID:, and then click Edit to open the Rich Text Editor. You select the Parcel ID field from the Field Token drop-down list, click Insert to insert it into the feature label, and then click OK to close the Editor. The Feature Layer box now contains Parcel ID: {PID}. In the viewer, the {PID} part will be replaced by the current parcel's ID.
You follow a similar procedure for the Feature Description and Feature Long Description. The Feature Description will say Owner: followed by the owner's name. The Feature Long Description will give the owner's name and the address, each appropriately labelled. The configuration is shown below.
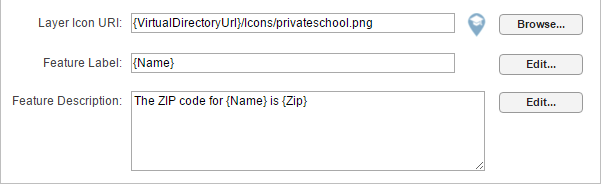
Feature settings containing field tokens
After applying your changes and saving the site, you launch the viewer to verify your configuration. You zoom in close enough to see individual parcels, and then you use an Identify tool to identify some parcels. You also click one of the feature labels in the Results List to open the feature details window. This allows you to check that the feature information is presented the way you want it.
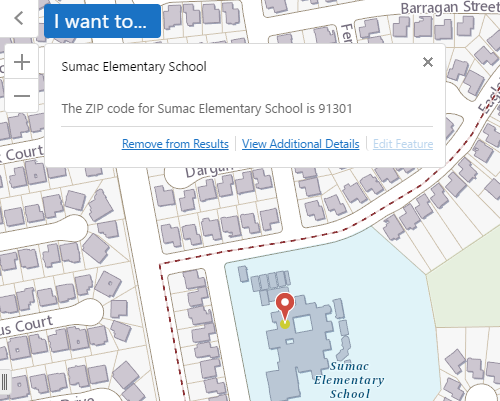
Feature information, with the field tokens replaced by data
Insert Field Tokens Using the Rich Text Editor
To insert field tokens using the Rich Text Editor:
-
Click the Edit button beside the item that you are configuring.
Every configuration item that can contain field tokens has an Edit button beside it.
-
Select the field token that you want to use from the Replacement Token drop-down list.
-
Enter the content, omitting any field tokens.
-
Position the cursor where you want to insert the field token that you selected.
-
Click Insert.
The field token is inserted at the cursor position.
-
Continue to insert as many field tokens as you want.
-
Click OK.
Object Tokens
Object tokens are placeholders that represent GIS objects, specifically features, graphics, and geometries. They enable you to define hyperlinked viewer commands that take objects related to the current feature as parameters.
In the viewer, each object token is replaced with the object that the token represents, for the current layer. For example, you could create a Zoom to Feature hyperlink that executes the ZoomToFeature command on the current feature when a user clicks the hyperlink.
Geocortex Essentials has three object tokens:
-
{$Feature}: Represents the current feature.
-
{$Graphic}: Represents the graphics object associated with the current feature.
-
{$Geometry}: Represents the geometry of the graphics object associated with the current feature.
You can use the {$Graphic} and {$Geometry} object tokens with the RunWorkflowWithArguments command. You cannot use the {$Feature} object token with the RunWorkflowWithArguments command.
You cannot use the Rich Text Editor to enter object tokens—you must type object tokens into the HTML markup. Make sure you use the correct capitalization when you type in an object token—Geocortex Essentials will not recognize the token if the capitalization is wrong.
Example: Use the $Geometry Object Token as a Workflow Argument
Because workflows can take geometries as parameters, the {$Geometry} token is particularly useful for hyperlinks that run workflows. This example illustrates how to pass the geometry of the current feature to a workflow. The workflow is run using the RunWorkflowWithArguments command.
Suppose you are working on a project to remediate contaminated soil at an old industrial site. In addition to the parcel itself, you are responsible for an area surrounding the parcel where contaminants have seeped. To help you define the area to be remediated, you have a workflow that buffers the current parcel. The workflow takes the parcel's geometry as an argument.
You have already added the workflow to your site. The workflow's ID is BufferParcel.
To make the workflow available in the viewer, you edit the Parcels layer and define a hyperlink in the Feature Description that runs the workflow. The markup for the hyperlink is:
<a href="command:RunWorkflowWithArguments?workflowId=BufferParcel&ParcelGeometry={$Geometry}">Create Remediation Buffer</a>
After applying your changes and saving the site, you launch the viewer to verify your configuration. You zoom in close enough to see individual parcels, and then you use an Identify tool to identify a parcel. You also click the parcel on the map to see its map tip. To test the workflow, you click one of the hyperlinks.
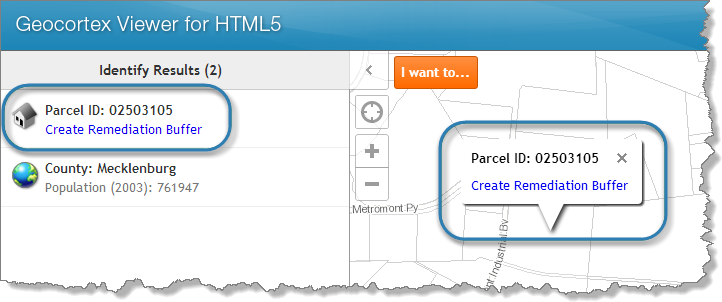
Hyperlink that runs a workflow, shown in the Results List (left) and in a map tip
Data Link Tokens
Data link tokens are placeholders that represent the fields in a data link. They are similar to field tokens, except that they represent the fields in a data link instead of a layer.
Data link tokens enable you to create text and hyperlinks that vary according to the current feature. When an item that contains a data link token is displayed in a viewer, the viewer replaces the token with the value of the specified field in the specified data link. The data link must be configured for the layer that the current feature belongs to.
Like field tokens, you can embed data link tokens in the Feature Label, Feature Description, and Feature Long Description, and in feature hyperlinks.
The form of a data link token is {DataLinkID.FieldName}. You can find out the data link ID from Manager. You can find out the field name by editing the layer, clicking the Data Links tab, and clicking the data link's ![]() Advanced icon.
Advanced icon.
You cannot use the Rich Text Editor to insert data link tokens. Instead, you must input them manually.
For example, suppose a user identifies a particular parcel on the Parcels layer. The Parcels layer does not have owner information in it, however, it has an OwnerInfo data link configured for it, which links to a database of owner information. If the feature description for the Parcels layer contains the {OwnerInfo.PrimaryName} data link token, the token is replaced by the value of the OwnerInfo data link's PrimaryName field when it is displayed in the Results List.
Suppose that, instead of a PrimaryName field that contains the name of the primary owner, the database has an OwnerNames field that can contain multiple names. This is a one-to-many relationship—one field can contain many values. In this case, the viewer would replace the {OwnerInfo.OwnerNames} token with the first name in the OwnerNames field. Viewers always display the first value if there is more than one.
Relationship Tokens
Relationship tokens are placeholders that represent the fields in a layer or table that is related to another layer. They are similar to field tokens, except that they represent the fields in a related layer or table.
Relationship tokens enable you to create text and hyperlinks that vary according to the current feature. When an item that contains a relationship token is displayed in a viewer, the viewer replaces the token with the value of the specified field in the specified related layer or table.
Like field tokens, you can embed relationship tokens in the Feature Description and Feature Long Description. However, you cannot embed relationship tokens in the Feature Label or in feature hyperlinks.
The form of a relationship token is {RelationshipName.FieldName}. To determine the relationship name, edit the relationships of a layer in Manager, or look at the ArcGIS Layer endpoint. You must get the field name from the data source itself, that is, the ArcGIS Layer or Table. Related layer or table field names are not available in Manager.
Because Manager does not know the field names in related layers or tables, you cannot use the Rich Text Editor to insert relationship tokens. You must insert them manually.
For example, suppose a user identifies a particular parcel on the Parcels layer. The Parcel layer does not have owner information in it, however, it has an OwnerInfo relationship configured for it, which links to the OwnerInfo table of owner information. If the feature description for the Parcels layer contains the {OwnerInfo.OwnerName} relationship token, the token is replaced by the value of the OwnerInfo table's OwnerName field when it is displayed in the Results List.
If a parcel has many owners, it has a one-to-many relationship. In this case, the viewer would replace the {OwnerInfo.OwnerName} token with the first name found. Viewers always display the first value if there is more than one.
Insert Replacement Tokens
If you know the name of the token that you want to insert, you can simply type it in. Make sure you use the correct capitalization—Geocortex Essentials will not recognize the token if the capitalization is wrong.
To insert replacement tokens:
-
Click the Edit button beside the item that you are configuring.
Every configuration item that can contain replacement tokens has an Edit button beside it.
-
In the Replacement Token box, click the down arrow
 and select the replacement token that you want to use.
 -
In the bottom box, type as much of the item's configuration as you can, omitting the replacement tokens.
-
Position the cursor where you want to insert the replacement token that you selected.
-
Click Insert.
The replacement token is inserted at the cursor position.
-
Continue to insert as many replacement tokens as you want.
-
Click OK.